As with winter clothing, it's important to store extra blankets for weathering through a winter emergency.
If you don't have old blankets around, you can acquire them inexpensively from thrift stores. People donate them all the time, but they don't sell very fast (especially blankets that aren't "pretty" or have holes). Since we'll be putting them in a box to save in case of emergency, "pretty" is not a consideration. Patch holes and launder blankets before storing.
Look especially for all-wool blankets, such as military surplus. These blankets are fabulous- they will keep you warm even if wet.
Store blankets with mothballs in boxes marked "Extra Blankets".
A word on using them in an emergency: You will be much warmer if you use two blankets- one on top of you, and one beneath you. This can be a lifesaver if you have no heat during a winter disaster.
Thursday, August 25, 2011
Winter Clothing
A question for the reader: When you buy new winter clothing, what do you do with your old items? Do you donate them? Put them in a box and forget about them? Throw them away?
Here's a suggestion: When you replace winter clothing items, store your old items. Make whatever repairs need to be made to them- patching or sewing holes, replace zippers, etc., and then store them with mothballs in boxes labelled "Extra Winter Clothing". They don't need to be pretty to serve a function- namely, ensuring you have backup supplies of warm clothing in the event of a sustained emergency during winter conditions.
For winter footwear, make sure they are thoroughly cleaned before storing. Store them with dryer sheets inside to absorb moisture and odors. Even if the soles are worn down, they can still provide warmth, and are better than relying on sneakers if your primary winter boots are damaged or lost during an emergency.
This also includes winter gloves, hats, and socks. If you find good buys on these items (off-season clearance sales, for example, or excess items sold cheaply at thrift stores), stock up and store them. Again, they need not be "pretty"- they need to be warm. These items get wet fastest, and wear out most frequently, so store as many as you can.
"Doing Your Business"
What would you do if your toilet were unavailable for an extended period of time? This could easily happen during a disaster scenario.
Digging a cathole or latrine outdoors is a possibility- except in very foul weather. Bucket-flushing your toilet may also be a viable option- but don't rely on it.
As a backup option, I recommend buying an inexpensive camping toilet. This one sells for $16 plus shipping. Replacement bags are $4 for a pack of 12, or you can use black plastic trash bags to make your own replacement liners.
Also, make a plan for disposing of the waste.
Basic First Aid Kit
It goes without saying you'll need to be able to treat injuries. For this, you'll need a first aid kit.
First- DON'T buy a prepackaged first aid kit. Prepackaged kits are overpriced, and usually contain alot of items you don't need many of (like bandaids) and none of the really critical items.
To start, you'll need a box to store your first aid kit in.
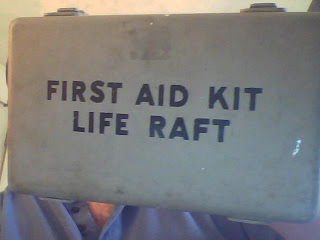
This is mine. It's a Korean War-vintage Navy lifeboat first aid box. It was given to me when I was a kid, but you can get one (or a similar one) online for just a few dollars. This box is absolutely airtight (before writing this, I filled my kitchen sink with water and immersed the box with a paper towel inside. It floated. I had to hold it down to check for leaks, and the paper towel was dry afterward). A first aid kit box you'd buy today would be made out of cheap plastic, and likely wouldn't be airtight like this.
Now, what to put in it? Here are my suggestions:
Battle Dressing and QuikClot: For staunching major blood loss, such as a gunshot wound.
A roll of gauze, gauze pads, an eye pad, and bandage tape.
A few bandaids and antibacterial ointment such as Neosporin.
An ACE-type bandage.
Burn relief ointment.
A good pair of tweezers. If you must remove a deeply-embedded object, such as a splinter, you'll be glad you spent the extra few dollars for a quality pair of tweezers. Also, a small magnifying lens is helpful. You can get one in a small eyeglasses screwdriver kit for just a few dollars at many "dollar" stores.
A pair of EMT-type shears. Even these mini shears are excellent. They're for cutting through clothing in order to access wounds.
This list is by no means exhaustive. You may get ideas for more items from taking a first aid/CPR class.
Additionally, I keep a rubbing alcohol and Povidone-Iodine solution handy, for disinfection. These are already sold in watertight bottles, so packing them in your watertight first aid box isn't important.
Saturday, August 20, 2011
First Aid/Medical Training
For those readers who do not have medical training, it's important to develop basic first aid and CPR skills. There is no better commercially-available source for this training than the Red Cross. Classes are usually inexpensive (Red Cross affiliates usually don't publish course fees, so you will have to make contact and inquire about the cost), and the training is universally recognized. As an added bonus, some insurance carriers give discounts for having a Red Cross first aid or safety certification.
A word for anyone with medical training, whether basic or extensive: I highly recommend that you not advertise this particular skill set during an emergency, and insist that others follow your lead. This includes not volunteering to assist strangers, as well as concealing your medical supplies and not rendering aid in public places. In an emergency setting, persons with medical skills and supplies will be in high demand. In some emergencies, persons known to have medical skills have been abducted in order to render aid to an injured family member or friend of the abductor. Remember, desperate people will do desperate things, and a desperate person may not see the difference between a medical doctor and a grown-up Boy Scout.
A word for anyone with medical training, whether basic or extensive: I highly recommend that you not advertise this particular skill set during an emergency, and insist that others follow your lead. This includes not volunteering to assist strangers, as well as concealing your medical supplies and not rendering aid in public places. In an emergency setting, persons with medical skills and supplies will be in high demand. In some emergencies, persons known to have medical skills have been abducted in order to render aid to an injured family member or friend of the abductor. Remember, desperate people will do desperate things, and a desperate person may not see the difference between a medical doctor and a grown-up Boy Scout.
Thursday, August 18, 2011
Fortify Your Home
News of riots in London recently has compelled me to address the subject of protecting one's home and family from rioting.
In the event of widespread rioting, it's obvious that going outside into danger should be avoided if possible. It's up to you to decide, based on immediate circumstances, whether it is safer to shelter in place or evacuate. If your decision is to shelter in place, here are some things you can do to make your home safer.
The key to fortification is to create layers of defense. Employing all of these options simultaneously will improve your safety.
Obscure the inside of your home from outside observation. If you appear to be vulnerable, rioters may select you for attack. Covering your windows from the inside with black plastic (garbage bags are an inexpensive way to do this) can help eliminate any visual clues about your potential vulnerabilities. The plastic will also capture broken window glass, rather than the glass falling onto your floors where it can become a hazard. Small openings in the plastic can be used to observe what's going on outside, and can be easily covered to prevent persons outside from looking in.
Barricade access points. Use furniture to block doors. Blockades should be placed low for maximum effectiveness. For example, if a tall grandfather clock is used to block a door, it should be lowered onto its side rather than placed standing. Adding weight to blockades and/or "wedging" them in place (for example, placing a couch between a door and the bottom of a staircase) improves their effectiveness. A stick should be placed in the track of sliding doors and windows to prevent them from opening. Small wedges should be used as stoppers for doors, in addition to blockades.
Place disuasion devices around windows which can't be blocked. Intruders may avoid doors and instead attempt to make entry through windows, especially rear windows. An easy disuasion device is to use a piece of carpet or cardboard, which is as long as the window's width. Drive nails or sharp screws, approximately two to three inches apart, through the mat, pointing upward. Place on the floor- not the windowsill- so an intruder climbing through the window will step or fall onto it. (Note: Boobytraps employed within one's home are prohibited or regulated in some states. Check your local laws before constructing or using such devices.)
Exercise noise and light discipline. Sounds can alert outsiders to what you are doing, how many people are inside your home, your condition, etc. Convseration should be kept quiet, use of noisy radios, televisions, and appliances should be minimized, and so forth. Lights should be kept turned down. Give away as little information as possible.
Create a "safe room". Use a centrally-located room, with as few access points as possible, to shelter family members in case of intrusion. Use furniture- mattresses, a desk or couch, etc.- to make a barricade for protection. Stacks of books or buckets of sand, bound tightly together, can provide some protection from gunfire. Preposition food, water, medical supplies, and extra weapons here.
Arm yourself! Weapons should be made ready-to-use immediately and always kept on the person or within arms' reach. In addition to firearms, also distribute other weapons, such as knives and baseball bats, and distribute flashlights to everyone.
Be alert! Pay attention to unknown sounds. Look outside periodically (using openings in your window coverings, mentioned above) to assess what is going on outside. If there are multiple adults, sleep in shifts so someone is always awake. If you are the only adult, make yourself sleep in the early morning, as the worst violence will likely occur in the late evening or at nighttime.
Storing Gasoline
It may be necessary to evacuate your home in the event of a disaster. In the event of a mass evacuation, it's a real possibility that so many people evacuating all at once will cause gas stations in and around the evacuation area to sell out of fuel.
Because of this, it is a good idea to store and rotate an emergency fuel supply for your vehicle.
Purchase several two-to-three gallon fuel containers. I recommend this size, rather than larger five-gallon containers, because a full container can still be easily handled if you are sick or injured. I also recommend purchasing, rather than improvising, this item- these containers are specifically designed and labelled for fuel storage. This model sells for $11. Fill one of these containers each time you fill your car (at current gas price, it will cost an extra $10 or so). Mark on the container the date you filled it. Once you have several full containers accumulated, rotating your fuel supply costs nothing extra- simply empty a container into your gas tank, and the amount you would have spent to fill your tank will instead top it off and replace the fuel in the can.
Using this model, in a few months' time you can lay in 10-20 gallons of fuel (more than enough to escape the danger area without relying on gas stations), accumulate it little by little, and keep it constantly fresh.
Subscribe to:
Posts (Atom)