Bleach is wonderful stuff. It kills just about any lifeform too small to see with the naked eye; it eliminates food smells; and in a pinch, small amounts of it can be used to make water safe to drink.
After a disaster, cleanliness is vital. If your home is still habitable, you should perform a thorough cleaning soon after the event, and maintain that level of cleanliness.
Stock up on as much bleach as you can, either by including a bottle in each of your weekly purchases, or by devoting one of your $20 expenditures to buying a case of it at a wholesale club.
Monday, April 4, 2011
Pest Control Basics
In any disaster scenario, animal and insect encroachment is going to become a major concern. Fires, floods, and earthquakes drive pests from their abodes, and they seek shelter elsewhere (including your home). Riots will often force stray animals (as well as domesticated pets) to seek refuge and search for food.
Pests will pilfer your supplies, create unsanitary conditions, and create a physical danger. Even if your home survives the initial disaster, you can still be forced to abandon it if pest encroachment becomes too severe.
The key to pest control lies in creating "layers of defense", which are all employed simultaneously. Having just one means of pest control is not sufficient, because no single means of pest control is 100% effective; pests will eventually overcome that single means.
The first layer of defense is creating a barrier. Perform an inspection of your home (prior to an emergency). Look for places, both inside and outside your home, where insects and small animals can enter. Seal these breaches. Inspect your home regularly. Also, keep plastic sheeting and sealant (such as duct tape) available, for covering broken windows, holes in your walls, and other damage to your home which can occur during an emergency.
Your second layer of defense is dissuasion. A number of devices are available which emit ultrasonic sounds many pests find uncomfortable. Some are battery-powered, such as this unit, or solar-powered, such as this unit.
Your third layer of defense consists of traps and poisons. You should buy, and safely store (see below), various types to combat the variety of pests you are likely to encounter. If a crisis occurs, deploy these measures as soon as possible, as animal and insect encroachment will happen very quickly.
The fourth layer of defense is sanitation. Keeping your home clean, and eliminating food and other smells which attract pests, will help to reduce the likelyhood of encroachment into your home. This includes frequent cleaning, as well as storing your supplies (and anything else attractive to pests) in pilfer-resistant containers, away from areas where pests are most likely to inhabit.
The fifth layer of defense, as a last resort, is actively killing pests. This includes insect sprays and swatters, pepper spray for driving off stray animals, and weapons. A simple BB gun can be used to kill small pests, even inside the home; more drastically, a .22 rifle or .410 shotgun can tackle larger or faster-moving pests. Burning out insect nests is also an option.
Your pest control products should be stored in a rigid, waterproof container, labelled "Pest Control". The last thing you need is a "double-dinger"- flooding which both drives pests into your home, and destroys your means of combating them.
Clearly, it's better to prevent pest encroachment than to have to kill each and every one which enters your home. The "fifth layer of defense" described above isn't a last resort because of ethical concerns about killing animals- it's a last resort because it's the least-efficient way of dealing with the problem. Additionally, in the case of firearms, you may have only a limited supply of ammunition, which should be conserved.
Where To Store Your Supplies
Along with accumulating supplies, the question of where to store them must be addressed. I will address it briefly.
Obviously, a basement provides a great deal of storage space- however, there are downsides to basement storage. First, a flood will obviously fill your basement with water before it affects the rest of your home, and this can destroy much of your supplies. Waterproofing your supplies, and storing them in rigid containers, can reduce this risk. Second, animal and insect pilferage is a concern. Any natural disaster is likely to force pests into populated areas, and they may seek shelter in your home, particularly in a dark, secluded basement. Third, if your home collapses (which is a distinct possibility), your emergency supplies will be buried under the scrap pile which used to be your home.
For these reasons, at least some of your supplies should be stored above-ground. If your home has a second floor or an overhead crawlspace, this is an ideal place to store supplies. The higher, the better.
Flashlights Without Batteries
In a crisis situation, without power, batteries are clearly going to be in short supply. Being able to see in the dark is a critical factor for improving your survival situation.
Fortunately, there are several varities of flashlights which require no batteries. Some of them are so inexpensive that they are given away for free with the purchase of other items.
First, there is the shake type. These are ridiculously inexpensive. One model sells for $3.00. Amazon also offers three of these flashlights, in different sizes, for $17.00. Add another item for $9.00 or more, and you get free shipping too. Have a few of these lights in your emergency supplies and/or around the house.
There is also the "dynamo", or "hand-crank" type. These often have other features- a built-in AM radio, strobe, even a cell phone charger. Many of these lights sell for under $25. Device charging options include a set of universal jacks, such as this model; or a USB charger jack like this one (for charging numerous devices); or a universal 12V adapter, like this model (for powering a variety of 12V DC devices). Check the manufacturer's websites to see if the model you want to buy is compatible with your cell phones and other devices.
Having the ability to see in the dark, stay in communication, power some of your devices, and obtain public information from the authorities, all without the need for batteries, is a tremendous advantage in a crisis situation.
275 Meal Kit
Recently, Costco made news by offering emergency food buckets for sale online and in their stores, for about $80. Amazon offers a similar product for sale, currently priced at $110. The product is a bucket, purporting to contain "275 meals", offering a "3-month supply" of food in case of emergency. This sounds like a terrific deal- until we examine the product in detail.
It is packaged in 55 foil packets, each packet supposedly providing 5 meals. The serving sizes are TINY- about 120 calories each. In reality, each packet constitutes a single meal for a "big eater", or two small meals for a "small eater". This still may be a bargain- 55 meals which do not require rotation and will last up to 20 years in storage, for $2 per meal.
The meals themselves require water to prepare and consume- and the food is largely a "wet diet" of soups, stews, and whey milk, with occasional pasta and pancake servings. On the one hand, this means additional water intake. On the other, it provides a way to utilize water which is safe to drink, but may have subtle undesireable flavors (from purifying chemicals, etc).
According to the manufacturer, the food itself is vegetarian and free of allergy-provoking ingredients. This is a nice feature. Also, the entire food supply fits in a single bucket, which is ideal if one has limited storage space or needs to evacuate their home.
As a sole food source, I would vote "nay" on this product. The "wet diet" may cause gastrointestinal upset (read: diarrhea), which can be dangerous if one is already sick or injured. It is definitely not a "3-month supply" as advertised. However, as a supplement to existing food stocks, and as a portable food supply in case of evacuation, it can serve well in one's emergency planning.
Reducing Water Usage
Having addressed storing water and obtaining water, I now want to turn to reducing water usage, as part of the "water plan" for a disaster.
It's obvious that the things we use large quantities of water for- namely, sanitation and personal hygiene- will still be a necessity in a crisis scenario . In fact, cleanliness and sanitation is more crucial in a crisis environment, since earthquakes, flooding, fires, etc., create unsanitary conditions.
Finding ways to reduce water usage conserves water for consumption.
Showering: The greatest water usage for personal hygiene, by far, is bathing. Simply making a decision to bathe less is not an option. Also, your home plumbing may not be functional, so it's important to have a means of keeping your body clean without a working shower.
An inexpensive (and waterless) option is flushable wet wipes (basically, the adult version of baby wipes). A resealable bag of 240 of these wipes can be bought for $5 at Walmart. 240 of these wipes can be a substitute for several dozen showers. If the wipes dry out in the bag, a very small amount of water can be added to the bag to rehydrate them. Also, the wipes can be easily warmed, in the bag, to simulate the psychological effect of a hot shower. Particular attention must be paid to small cuts and scrapes on your body, as well as the areas which produce and accumulate bacteria (we all know where I mean). Clean these areas with Povidone-Iodine solution (commonly labelled as "First Aid Antiseptic"). $20 will buy several bottles of it.
Additionally, it will still be a good idea to have an actual water shower regularly. For this purpose, you can purchase a solar camp shower, such as this model or this model. The shower bag is filled with water and hung in sunlight to heat. If the available sunlight isn't intense enough to warm the water, hot water can simply be put into the bag. There are dozens of models available, simply search Google for the terms "solar shower" and "camp shower".
For other personal hygiene uses, such as shaving and brushing teeth, simply learning to perform these tasks with minimal water is a good idea. Practicing these activities with a small cup of water is a useful exercise for emergency water rationing. Also, stocking hand sanitizer to use in lieu of routine handwashing will help reduce emergency water usage.
Sanitation: We will still need to flush toilets, wash clothes and dishes, and keep your home environment clean. Learning to reuse water will dramatically reduce your total water usage.
When buying detergent for your emergency supplies, purchase the "cold water" detergent now available in grocery stores. Less water is required to dissolve this detergent.
Obtain several buckets (empty sherbet buckets with handles and lids are excellent for this, and can be stacked together for compact storage), and label them "Gray Water" (the commonly-accepted term for "already-used" water which is not suitable for consumption). After hand-washing laundry and dishes, save the water in these containers, and use it for toilet flushing. Adding a small amount of bleach to this water is a good idea, since this water will contain microorganisms.
In addition to the obvious need for sanitation, there is a psychological component. Survival scenarios have a dehumanizing effect. People feel "less human" when having to survive under less-than-ideal circumstances. Good cleanliness provides a dramatic morale booster- it will help make you feel "more human".
Sunday, April 3, 2011
Water Filtration
Clearly, you won't be able to store enough water to meet your long-term needs.
Luckily, you can augment your water supply by obtaining and purifying locally-available water.
First, look around the immediate surroundings of your home. Where are there natural water sources? Wells, streams, etc. Try using Google Earth to get a picture of your neighborhood. Use this as a map, and mark the locations of water supplies, if they are difficult to find.
You'll need to be able to transport water from the source to your home. An easy, and cheap, way to do this: Obtain a small metal wagon (like a Radio Flyer-type). Look around garage sales and at thrift stores for one. Why the wagon? Simple: it's easier than carrying water containers, especially if you are sick or injured. Even if you're in good condition, save your strength. Buy a few water containers from Walmart or some other retailer. Mark these containers "Unfiltered Water", so you and others know not to drink from them. You can secure these containers to the wagon with cord or bungees.
You'll need to purify any locally-obtained water, too. For safety's sake, consider all natural water supplies contaminated, especially after a disaster, which can introduce pollutants into water supplies.
Rather than buy filters (which are expensive), you can make them.
First, you'll need sand. Instead of buying it, try finding it for free. Beach sand will work. Another idea: if your local highway department uses sand instead of salt to de-ice the roads, they'll have tons of the stuff. Ask if you can have a gallon or two of it.
Sift the sand through a colander to remove any foreign matter. Bake the sand in your oven at 250 degrees for an hour to kill any microorganisms and to remove any moisture. Store it in clean, dry glass jars with lids. Store several jars of it, if you can, and write "Water Sand" on the lids.
Next, you'll need cheesecloth. Either buy a roll of it, or get creative about finding some for free.
You'll also need a coffee can. Poke several holes in the bottom of the can (punching them from the inside, so the holes pucker outward). Line the can with cheesecloth, and let the cloth hang over the rim. Pour about three inches of sand into the can, and shake gently to settle the sand. Rubberband the cheesecloth around the rim to prevent it falling inside. You now have an effective water filter.
To use it, pour water slowly into the filter. You don't want to create a water/sand slurry inside, so pour slow and let the water trickle, little by little, through the sand, into a container. Label this container "Filtered/Not Yet Boiled", so you know not to drink from it or mix it with water from other containers. Every 20-30 gallons, change the cheesecloth and sand inside. You can reuse the sand by sifting and baking it again.
Once filtered, boil the water and pour into a drinking water container. This will kill microorganisms too small to be captured by the filter.
There you have it: Finding, obtaining, transporting, and purifying water, on the cheap.
MacGyver Box
Find a large cardboard box, and a place to put it. Write "MacGyver Box" on the side of it.
Use this to store useful junk items. Things you get for free (or nearly free).
What are useful items? Anything! Examples:
Rubber bands
Paper clips
Condoms (often free at the doctor's office)
Glass jars (empty and clean, with lids if available)
Coffee or paint cans (empty and clean, with lids if available)
Empty pill bottles (remove the labels)
Lighters (put them inside of something else to keep them from discharging)
Any sort of cables, power cords, etc.
Bits of string, rope, twine, wire, etc.
Any loose hardware (pins, screws, nails, etc.)
Extra batteries (cover the tops of 9-volt batteries)
Unused knives, scissors, sharpening stones, and other cutting tools
Matches (if you're a smoker or know a smoker, ask for a book of matches each time you buy cigarettes) (store matches in a ziploc bag)
Partial rolls of tape (any type- scotch, duct, electrical, etc.)
Buttons, caps, zipper pulls
Unused bags (especially ziplocs in all sizes, big and small)
And so forth.
As far as getting cardboard boxes, you can get them from a grocery store. Ask a store employee if they have any extra boxes you can have. Stock up on them.
When you find these items (and others you can think of!) for free, take them home and put them in your MacGyver box. They will be useful for future projects featured on this blog.
Shotguns Under $300
Shotguns. They're powerful, simple to use and maintain, and easy for the novice shooter to learn to use effectively. We'll cover shotguns in this part of the Firearms Under $300 topic.
In the under-$300 category, there are a number of pump-action shotguns available, both new and used, which are sufficient to meet one's home protection needs. Note that I say "pump-action". I have never seen a reputable semi-automatic shotgun available within our price range. That's not to say one doesn't exist, just that I haven't seen one.
There are a few characteristics to look for in a home defense shotgun. First, a short barrel- 18" is the legal minimum in the US. 18"-20" is short enough to be maneuverable within the confines of one's home. Second, larger magazine capacity. A full-length magazine tube (which extends the full length of the barrel) is desireable. If the shotgun you want to buy doesn't have this feature, there are aftermarket extensions available which are easily installed. Third, is the type of choke (tapering of the muzzle end of the barrel). Buy a shotgun with a "cylinder", or "improved cylinder" choke.
Also, a word on ammunition: There are two conventional types of shotgun ammunition for personal protection: buckshot and slugs. Without going into lengthy detail (that's what Google is for), if you live in a densely-populated area, I recommend sticking with buckshot. It's less likely to penetrate exterior walls and endanger your neighbors. Also, cheaper training can be accomplished with less-expensive birdshot (which is generally not suitable for self-defense).
Another word on ammunition: 12-gauge is the most common shotgun cartridge, and bulk ammunition is cheapest for it. However, for smaller-statured or otherwise recoil-sensitive persons, a smaller 20-gauge shotgun is a viable alternative.
So, let's look at a few examples of good-quality shotguns:
Remington 870

Remington's 870 model is a classic. For 50 years it has been the shotgun most commonly found in police arsenals, due to it's reliability and affordability. Many 870s can be found used for under $300, and sometimes new ones can be found at around $300 as well.
Mossberg 500/590

Also extremely popular with police agencies, as well as being a standard-issue shotgun in the US military, the Mossberg 500 and 590-series shotguns are rugged and reliable. Many of them (such as the one above) also have an built-in extended magazine tube, to hold up to 9 shotshells (depending on the model). These shotguns tend to be slightly more expensive than comparable Remington models, but many can still be found (used) in the under-$300 price point.
Winchester 1300 Defender

Winchester's excellent 1300 model is also frequently available in this price range. Winchester offers the 1300 in a purpose-built "Defender" model, as shown above, with a full-length magazine tube and "open" ("cylinder") choke. If you decide to buy a 1300, look for a Defender.
In the under-$300 category, there are a number of pump-action shotguns available, both new and used, which are sufficient to meet one's home protection needs. Note that I say "pump-action". I have never seen a reputable semi-automatic shotgun available within our price range. That's not to say one doesn't exist, just that I haven't seen one.
There are a few characteristics to look for in a home defense shotgun. First, a short barrel- 18" is the legal minimum in the US. 18"-20" is short enough to be maneuverable within the confines of one's home. Second, larger magazine capacity. A full-length magazine tube (which extends the full length of the barrel) is desireable. If the shotgun you want to buy doesn't have this feature, there are aftermarket extensions available which are easily installed. Third, is the type of choke (tapering of the muzzle end of the barrel). Buy a shotgun with a "cylinder", or "improved cylinder" choke.
Also, a word on ammunition: There are two conventional types of shotgun ammunition for personal protection: buckshot and slugs. Without going into lengthy detail (that's what Google is for), if you live in a densely-populated area, I recommend sticking with buckshot. It's less likely to penetrate exterior walls and endanger your neighbors. Also, cheaper training can be accomplished with less-expensive birdshot (which is generally not suitable for self-defense).
Another word on ammunition: 12-gauge is the most common shotgun cartridge, and bulk ammunition is cheapest for it. However, for smaller-statured or otherwise recoil-sensitive persons, a smaller 20-gauge shotgun is a viable alternative.
So, let's look at a few examples of good-quality shotguns:
Remington 870

Remington's 870 model is a classic. For 50 years it has been the shotgun most commonly found in police arsenals, due to it's reliability and affordability. Many 870s can be found used for under $300, and sometimes new ones can be found at around $300 as well.
Mossberg 500/590

Also extremely popular with police agencies, as well as being a standard-issue shotgun in the US military, the Mossberg 500 and 590-series shotguns are rugged and reliable. Many of them (such as the one above) also have an built-in extended magazine tube, to hold up to 9 shotshells (depending on the model). These shotguns tend to be slightly more expensive than comparable Remington models, but many can still be found (used) in the under-$300 price point.
Winchester 1300 Defender
Winchester's excellent 1300 model is also frequently available in this price range. Winchester offers the 1300 in a purpose-built "Defender" model, as shown above, with a full-length magazine tube and "open" ("cylinder") choke. If you decide to buy a 1300, look for a Defender.
Handguns Under $300
Part One of my Firearms Under $300 topic: Handguns. A number of good-quality handguns are available in the under-$300 price point.
A word on handguns: Read your state laws regarding owning and carrying handguns. Also, if your state requires a license or permit to acquire or own a handgun, this will increase the total cost.
This list is hardly all-inclusive. It's not representative of all the quality inexpensive handguns available; rather, it's to provide some examples of handguns the reader "can't go wrong with".
Walther P1:

The Walther P1 is the post-World War II upgrade of the venerable P38 pistol, with an aluminum alloy frame. These were the standard sidearms of the German and Austrian militaries until the 1980s, and in Austria, they are still very popular for civilian self-defense.
When these pistols first hit the surplus market a few years ago, they sold for about $200. Many of them are still available in the under-$300 price point. The above photo is from AMMOMAN, who occasionally has them for sale within this price range.
As far as ammunition cost, the cheapest centerfire ammunition available is 9mm Parabellum (Luger) ammunition, which this handgun uses. It is also the standard pistol caliber for NATO countries. Lucky Gunner currently sells 1,000 rounds of 9mm practice ammunition for $205.
CZ-82 and CZ-83:

These pistols are produced in the Czech Republic. Those offered for sale inexpensively are typically Czech military surplus, from before the fall of Communism in Europe. They are well-made, reliable handguns.
The difference between the two models is the caliber. The '82 fires the 9mm Makarov cartridge (not to be confused with 9mm NATO, see above); whereas the '83 fires the .380 ACP cartridge. Makarov ammunition is cheaper in bulk, but that bulk supply is former Communist surplus, and will eventually dry up; .380, on the other hand, is an American cartridge, commonly found in gun stores (and every Walmart I have ever been to).
J&G Sales is currently offering surplus CZ-82s for $199, and CZ-83s for $230- including shipping to your local dealer, and a reasonable transfer fee, this still puts the price in our price range. Accessories such as holsters are also cheap and easy to find.
On the subject of 9mm Makarov ammunition, let's consider the pistol for which is is named:
Makarov PM
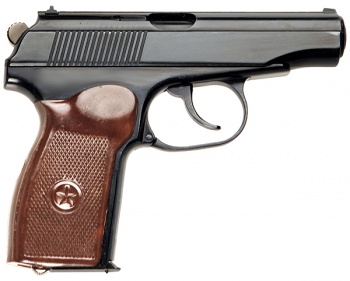
The Makarov PM pistol was the standard sidearm of the Soviet military, and many other Warsaw Pact nations, for 50 years. It is still commonly used throughout the world. Basically, it is a beefed-up rendition of the Walther PPK of James Bond fame.
It is simple to use and maintain, rugged, and inexpensive. Virtually all Makarovs for sale in the United States are available for under $300. Accessories are cheap as well.
Smith & Wesson Model 64:

Once a standard-issue sidearm for the NYPD, these wheelguns are now available inexpensively all over the country. For example, AIM Surplus recently offered them for $249. The .38 Special ammunition it fires is relatively cheap and very plentiful.
Large numbers of police trade-in revolvers are available on the used handgun market. They are very affordable, and are a good choice for the fact that they have often been "carried alot and shot a little"- the discount in price is usually due to surface blemishes from holster wear, rather than mechanical defects.
Also, accessories such as speedloaders and holsters are inexpensive for these revolvers.
A word on handguns: Read your state laws regarding owning and carrying handguns. Also, if your state requires a license or permit to acquire or own a handgun, this will increase the total cost.
This list is hardly all-inclusive. It's not representative of all the quality inexpensive handguns available; rather, it's to provide some examples of handguns the reader "can't go wrong with".
Walther P1:
The Walther P1 is the post-World War II upgrade of the venerable P38 pistol, with an aluminum alloy frame. These were the standard sidearms of the German and Austrian militaries until the 1980s, and in Austria, they are still very popular for civilian self-defense.
When these pistols first hit the surplus market a few years ago, they sold for about $200. Many of them are still available in the under-$300 price point. The above photo is from AMMOMAN, who occasionally has them for sale within this price range.
As far as ammunition cost, the cheapest centerfire ammunition available is 9mm Parabellum (Luger) ammunition, which this handgun uses. It is also the standard pistol caliber for NATO countries. Lucky Gunner currently sells 1,000 rounds of 9mm practice ammunition for $205.
CZ-82 and CZ-83:
These pistols are produced in the Czech Republic. Those offered for sale inexpensively are typically Czech military surplus, from before the fall of Communism in Europe. They are well-made, reliable handguns.
The difference between the two models is the caliber. The '82 fires the 9mm Makarov cartridge (not to be confused with 9mm NATO, see above); whereas the '83 fires the .380 ACP cartridge. Makarov ammunition is cheaper in bulk, but that bulk supply is former Communist surplus, and will eventually dry up; .380, on the other hand, is an American cartridge, commonly found in gun stores (and every Walmart I have ever been to).
J&G Sales is currently offering surplus CZ-82s for $199, and CZ-83s for $230- including shipping to your local dealer, and a reasonable transfer fee, this still puts the price in our price range. Accessories such as holsters are also cheap and easy to find.
On the subject of 9mm Makarov ammunition, let's consider the pistol for which is is named:
Makarov PM
The Makarov PM pistol was the standard sidearm of the Soviet military, and many other Warsaw Pact nations, for 50 years. It is still commonly used throughout the world. Basically, it is a beefed-up rendition of the Walther PPK of James Bond fame.
It is simple to use and maintain, rugged, and inexpensive. Virtually all Makarovs for sale in the United States are available for under $300. Accessories are cheap as well.
Smith & Wesson Model 64:
Once a standard-issue sidearm for the NYPD, these wheelguns are now available inexpensively all over the country. For example, AIM Surplus recently offered them for $249. The .38 Special ammunition it fires is relatively cheap and very plentiful.
Large numbers of police trade-in revolvers are available on the used handgun market. They are very affordable, and are a good choice for the fact that they have often been "carried alot and shot a little"- the discount in price is usually due to surface blemishes from holster wear, rather than mechanical defects.
Also, accessories such as speedloaders and holsters are inexpensive for these revolvers.
Firearms Under $300
In addition to your weekly spending plan, there will be a few large purchases to consider. One of these is the acquisition of weapons.
Simply put, any disaster is going to place you in danger of attack. Desperate people who have not prepared will resort to theft, robbery, even assault and murder, in order to obtain needed supplies. A crisis also limits the ability of police to provide adequate protection. A breakdown in public order, even a temporary one, provides an opportunity for persons inclined to break the law to do so without consequence.
I firmly believe personal protection should be a consideration even under normal, "civilized" conditions. The issue of personal protection becomes magnified under crisis conditions.
So, we come to the subject of firearms. A firearm is the most expedient means of personal protection.
(Note for the gun folks reading this: I am attempting to simplify the subject for the benefit of those with little or no knowledge. If you'd like to have a more technical discussion, feel free to email me!)
First, let's consider what sort of firearms are best-suited for the personal protection role. Common hunting firearms typically have very long barrels and limited ammunition capacity. We want a short weapon which is easy to maneuver within the confines of one's home, and sufficient ammunition capacity to engage multiple assailants.
Additionally, many common sporting weapons are "repeaters", in other words, the action must be operated manually for each shot (such as bolt-action, lever-action, and pump-action types). Given the fast nature of a violent assault, the need to work the action between shots may be a hinderance. This is less of a handicap with a pump-action shotgun than with other types of repeaters, since multiple shots are rarely needed to stop each aggressor. Otherwise, we want to consider semiautomatic firearms, as well as double-action revolvers, which fire a shot with each press of the trigger.
Second, let's consider caliber. A firearm "suitable for self-defense" should have sufficient "stopping power" (Note to the gun folks: I am normally loathe to use that term) for the purpose. On the other end of this spectrum, if one lives in a densely-populated area (as I do), many rifle calibers may have "too much" penetrating power, enough to pass through an adversary and an exterior wall of your home, and may endanger your neighbors.
Also, I'm going to omit rifles for another reason: Semiautomatic rifles have other incidental costs, such as magazines, which will drive them up in cost well above our $300 limit. There are a few exceptions, such as the excellent Yugoslavian SKS- but for a novice shooter, the SKS can pose other problems (which I may address in another post).
Third, we must consider the cost of ammuntion. Many military surplus firearms are sold cheaply, simply for the fact that ammunition for them is rare and expensive. We should stick to commonly-available calibers.
Last, and most important, is reliability. Purchasing a firearm with a reputation for reliability is crucial. If it isn't reliable to bet your life on, it isn't suitable for saving your life. Verify the reliability of your firearm by firing 200-300 rounds through it. If it doesn't malfunction, you're good to go.
Using these criteria, we will look at a number of firearms within our $300 price point. Note that this list is by no means comprehensive, nor is the information provided all-inclusive. I will break this down into two posts: Handguns and Shotguns.
Also, a note on pricing: I will frequently cite internet prices. It's against the law for internet or mail order dealers to sell directly to the public. These dealers must transfer the firearm to your local dealer. Internet prices do not include transfer fees and shipping. You will need to find a local dealer to complete an internet transaction.
Creating A Preparation Budget
Ask yourself this: Can you devote $20 per paycheck toward preparation?
If so, then you can accumulate a respectable supply, over the course of several months.
The key to preparation is to start accumulating early, little by little.
For illustrative purposes, I'm going to propose a $20 per paycheck purchasing plan:
Payday #1: Buy supplies: See the Basic Supplies post. Buy 1 or 2 plastic totes.
Payday #2: Buy 4-5 cans of food (see Canned Food) and a 2-gallon jug of water (see Water Storage). Buy a box of black garbage bags (explained in the water storage post).
Payday #3: Buy a 2-3 gallon fuel container and fill it with gasoline.
Payday #4: Buy 4-5 cans of food and a 2-gallon jug of water. Buy a roll of heavy-duty plastic.
Payday #5: Buy a hand-crank flashlight/radio.
Payday #6: Buy 4-5 cans of food and a 2-gallon jug of water. Buy 3-4 gallons of bleach.
And so forth.
In 6 months, you'll have a decent store of emergency supplies built up.
If you can devote $30 per payday, you can do even more!
Water Storage
The first part of the water issue is storage.
The first determination we need to make is this: How much water to store?
Unlike food, which is consumed at a more or less constant rate, water usage varies. In addition to drinking water, you will also use water for cooking, personal hygiene, washing clothes and dishes, toilet flushing, and the like.
Let's start with considering one's consumption needs first. This figure is variable. In both very hot weather and very cold weather, a person's nominal water needs increase. Water usage increases when one is injured, ill, under stress, or performing manual labor. Additionally, not all food is "water neutral", meaning that some foods require water intake for digestion.
I recommend over-estimating water consumption needs, for this reason. Let's assume 2 gallons of water, per person, per day. For a 30-day supply (our basic goal), this means 240 gallons for a family of four. Obviously, finding space to store this much water is a challenge.
As for the type of storage, there are a few budget options:
1) Grocery store water jugs- water sold in jugs at the grocery store is intended for immediate consumption. The water is not chemically shelf-stabilized, and the containers are intended for short-term storage. However, the shelf life can be increased dramatically by storing jugs away from heaters or windows, and out of direct sunlight. Also, consider wrapping the jugs in black plastic trash bags. These measures will limit the degradation of the plastic container from heat and light.
2) Buying and filling your own containers: This is an option, if you have access to a supply of cheap containers. If you choose this option, consider purchasing a chemical water stabilizer product such as PUROGENE. One 4-oz bottle will stabilize up to 120 gallons of water.
3) Buying a large water barrel: This is an option if you can afford the cost of the barrels, and if you have a place to store them (such as a basement). Also, water (once stabilized, see above) can be stored longer in these purpose-built containers. The only downside is weight: a 55-gallon drum of water weighs in excess of 400 pounds. Moving this requires a hand truck and decent physical condition. Also, you will need a hand pump for extracting the water, and smaller containers for carrying the water. If you choose this option, you should still have several smaller containers of water for immediate use.
AVOID buying pre-packaged "emergency" water. It is simply too expensive for the small amount of water you get.
Saturday, April 2, 2011
Water Basics
WATER.
It is the most critical item for survival. It's also the most space-consuming item to store. For this reason, pre-packaged survival kits NEVER contain enough water (one of several very good reasons not to buy them).
How much water do you need? Well, the military uses a figure for shipping water into combat zones: 20 gallons per soldier per day. This is a total amount for drinking, cooking, sanitation, etc.
Obviously, we can't store 30 days' worth of water, at 20 gallons per person per day, in our homes.
We'll need to break this subject down into three major segments, which I will address in individual blog posts:
Water Storage- You will have to store some water for immediate use;
Water Purification- Obtaining, transporting, and sanitizing locally-available water;
Water Reduction- Reducing the amount of water you use for purposes other than consumption.
Canned Food
Let's start with something basic: Canned food. It lasts years on a shelf, it's packaged in waterproof, pilferage-proof containers, and the food can be heated in the can. And canned food is relatively cheap.
Each time you go to the grocery store, buy a few extra cans of what you normally buy. Just two or three cans, each week, is an inexpensive way to stock up over time.
For maximum shelf life, store in a cool, dry place, away from heaters, windows, or light sources. You can buy a few sturdy plastic totes from Walmart or another retailer (I recently bought an 18-gallon Sterilite tote from Walmart on clearance for $4.80). Write "Canned Food" on the tote lid with a marker, along with the earliest "Best By" date on any of the cans (for example, if the soonest "Best By" date on any can is March 23 2012, write that date on the tote lid).
Why is this date important? For rotation. Once you've built up an adequate supply, you'll need to rotate items to prevent spoilage of your supplies. When items approach their expiration date, take them out, put them in your cupboard to use, and put a new item in (from your regular grocery shopping). Write the new soonest "Best By" date on the tote lid and remove the old date with rubbing alcohol.
You can use this method of rotation with more than one tote, obviously.
What exactly is "an adequate supply"? Well, answering that question involves setting goals for yourself. "Experts" recommend stocking three days' worth of food and water. This figure is based on the typical time for government agencies to begin providing relief. Emphasis on the word "begin". Full relief may take much longer- for example, following Hurricane Katrina, some people in the disaster area didn't "begin" recieving relief until almost two weeks into the disaster, and even then, the flow of supplies was not fully reliable.
So, I recommend starting with a reasonable (and attainable) goal of stocking 30 days' worth of food for each person in your home. From that point, additions can be made (providing for persons likely to shelter with you, for example). Stocking this much food could take months, buying it a few cans at a time. This is not a problem. Start stocking a little bit at a time now, and in several months, you'll have your 30-day supply.
Basic Supplies
In order to expedite your preparation work, you'll need a few supplies. You should have some of these items in your home already.
1) Sharpie-type markers: You'll need to label things. Sharpies can be used to write on plastic, cardboard, almost any surface. Unlike magic markers, the ink is sometimes removeable (see below).
2) Rubbing alcohol: Use this to remove Sharpie ink from plastic and metal to change information (for instance, to change expiration dates when rotating food).
3) Ziploc bags: You'll need to waterproof your supplies. ALL of your supplies. Also, some disasters, such as floods or forest fires, can drive animals and insects into populated areas (read: pests in your home). Pilfer-proofing your consumables (including toiletries and paper products) is a necessary precaution.
4) Storage containers: When you shop, ask a store employee if they have any empty cardboard boxes you can have. If they ask why, you can tell them you're moving (probably best not to advertise that you're a "prepper"). Stock up on these boxes, even if you don't have an immediate need for all of them.
5) Duct tape: For sealing boxes and bags.
6) Plastic bags: Save your disposable grocery bags. They can also be used for waterproofing. When used for this purpose, first check them for holes (and seal the holes with duct tape). Sometimes these will be adequate for waterproofing (saving you the cost of zipper-type bags), and other times not.
7) Black plastic trash bags: I will mention uses for these periodically. Obtain several rolls of them.
Some of these items also belong in your emergency supplies. Keep your emergency supplies and your preparation supplies separate. For example, have a roll of duct tape for sealing boxes and bags, and another roll of duct tape stored for emergency use.
Also, although it isn't necessary, a vacuum sealing appliance such as FoodSaver is a very handy thing to have. It helps preserve perishable items, and create your own custom-sized waterproof bags.
Purpose And Scope
Welcome to my new blog!
I was prompted to begin writing this, due to a recent casual discussion about the subject. I realized I've been doling out advice on this topic for years, and by jove, maybe I could spread the word a little bit better with a blog!
What qualifies me to offer this advice? Simply put: my own experience and consideration of the topic.
I began seriously considering disaster preparation, as many people did, during the Y2K scare. Many people (myself included) found themselves ill-prepared for a possible disaster. Luckily, said disaster never happened. We can learn from this failure, though, as well as disasters which have happened since 2000.
The purpose of this blog, is to demonstrate how one can stockpile excellent emergency provisions, even on a limited budget. Many people consider preparation "a good idea", but that idea will never materialize unless one actually begins preparing. This blog will help to serve as a guideline for beginning to prepare.
Let's consider the scope of the disasters one can imagine. Frankly, preparing for a complete and total collapse of societal order, government assistance, and the conventional economy is practically impossible (and perhaps overkill). However, one can imagine a number of possible, limited emergencies- floods, harsh winter conditions, riots, etc., which can be prepared for. Starting from this point, we can prepare, little by little, for more extreme circumstances- hurricanes, earthquakes, massive social breakdown- in a realistic manner.
There is plenty of information on the internet about preparation, and I advise searching and reading it.
Also, one must build survival skills- as noted survival expert Cody Lundin is fond of saying, "The more you know, the less you need". Over time, I will post links to excellent sources of information for developing skills. Supplies alone are not enough. One cannot buy preparedness.
So, let's begin!
NOTE: Nothing contained in this blog should be construed as legal, medical, or any other kind of licensed professional advice, nor as a substitute for advice from an applicable licensed professional. Information is provided for educational purposes only. The author is not responsible for loss or injury arising from use or misuse of information provided. Use this information at your own risk.
Subscribe to:
Comments (Atom)